Sunday, November 25, 2012

Big Chief Tablet Desk

When I got this little wobbly desk, I thought it might be a good project to work on,  wanting to save it from becoming one of those Pinterest aqua-painted shabby-chic furniture pieces that are becoming oh so common nowadays...
So, I thought I'd quickly scrape/strip off the multiple layers of paint, get it down to some nicely dark-stained, glowing wood with a single creamy white drawer. WRONG!
$on of a bitch, people! Three days of scraping with a variety of tools, steel wool, wire brushes and three different kinds of lame stripper and I remained far from my goal....why don't they bring back liquid Red Devil that ate off paint like the acid blood from the Alien movies!?? Gah!
Plus I cut my finger twice flying about the kitchen making Thanksgiving Dinner and being more creative by trying 'Sweet Potato Ravioli with Sage Butter Sauce'--a bit too heavy handed w/ the nutmeg....but I digress.
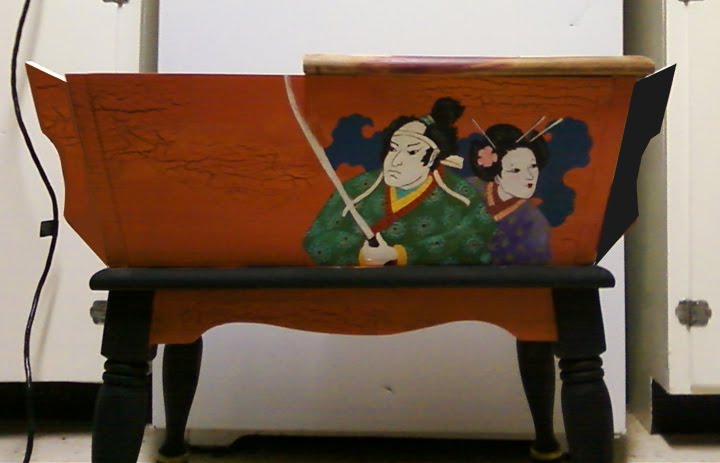
Sore fingers do not handle sandpaper well so I GAVE UP and grabbed some thin black paint. (Sigh)  I rubbed the thin paint with Ebony stain to sorta stay within my goal, left the top a nice wood (retaining its nostalgic burn mark, scar, ink & bleach stain, added antique-looking 'mercury glass' knobs to the drawer and, completed the piece with (TA DAH!) BIG CHIEF! 


Saturday, November 3, 2012

Mosaic Tile Tub Surround: Broken Tile

Finally--after numerous finger/knuckle slices, I've got this thing grouted with linen and white grout and sealed once. I tried to keep the thing lighter at the top since this bathroom is tiny. If I would of tried harder, I could of more randomly gradiated the dark and light together, but I was getting exasperated at all this expanse that needed filled in! I went back later and put some cowrie shells for a top border (not finished yet) and an occasional black marble--to let me know where the wall studs are--just in case I need to remember later.
So, here's who I can thank!
Ron Fox, tileman--for a lot of pieces of light colored tile (most of the expanse). Thank you so much--I owe you!
Belva--colored and dark tile odds and ends.
Tegan and Bailey--pebbles from their beaches that I picked up while visiting.
Brigham--the use of 30 brass bullet casings.
Jill--some of her mom's necklace beads/faux pearls.
Sarah's Treasures--beads and some colorful plates that I hammered to pieces.
Clay's--for encouragement.
My garage--various metal pieces that will probably rust later and spoil things.
Home Depot, Manhattan--mortar and grout.
Menards, Manhattan--sealer.

Mistakes have been made here and there, but it took way longer than I'd planned and it's not nearly as 'overboard' as I thought it was becoming--once the grout calmed down all those lines. I recommend not rubbing your hand across this thing swiftly--somewhere there's still a sharp edge! More info on earlier posts...


.There is a little blue crab waving in the corner, a frog face, a fish, a set of eyes, and 2 kitty faces hidden too!

Thursday, October 25, 2012

Mosaic Tile Shower


Adding some more broken tile...plodding along...I tried 2 areas with grout--one in white and one section with  a linen color.

Sunday, October 7, 2012

Broken Tile Mosaic in Bathroom


Well, I finally decided to try my hand at some bathroom DIY and ripped out two layers of wall crap surrounding my tub. In the past, one layer had been 1950's pink plastic 'tile' with black plastic trim. It had yellowed in spots with age? exposure to glues/chemicals? No matter--it's gone now and I replaced it with some backer board, adding extra nails/screws since I'd bought the wrong thickness (on the advice of a tile pro!) + it was easier for me to load and carry.
Broken tile in tans, rusts and ochre made nice swirls with a 'slap it on and go' method. No more hours spent carefully arranging pieces. Whew. A few days later, I added some more items--completely random--some broken plates, beach pebbles, colors, metal parts and even 'brass'. I'll use some necklaces and shells too. I think just doing bits at a time will allow me to contemplate each area--I've rushed things before and ended up unhappy--so far I'm fairly pleased, but I want to keep 'flow' and 'movement' a constant. There's even a little frog face, fish, and crab for wee ones!


Saturday, July 7, 2012

Painted Nightstand

Here's a cheap little crappy bookshelf/nightstand, spray-painted flat gray, then coated with some reds, gold and a little black paint and sharpie...rubbed with brown/black... I rather like it!  Sorry for the fuzzy images.

Painted 'Brick' Cabinet

Here's some more additions to the little cabinet--the front and the right side. Or left, depending on your lack of direction if you're like me!

Sunday, May 27, 2012

'Dollhouse' Apartment Building

Step one of the "DD Dollhouse"! White paint on an 'about to be thrown away' cabinet, (use slave labor--kids that need something to do!), then a rubbery rectangle in mango/red/sepia to add some bricks... Next stage--make some 'limestone' trim, darken edges everywhere for more realism, and add a variety of cool things in the windows and on the outside of the building!

Saturday, April 7, 2012

Oriental Cabinet

Experimenting with a figure from Google--no background design yet...this one is more or less practice and I can see some things I need to change already!
Don't know if this will be the back or front of the little cabinet I started in the post below...it crackled nicely when painted, but the store was out of the color I wanted, so I will probably rub something darker over it--too pumpkiny.
Not sure, but will probably keep adding some colorful figures, and designs, antique it and clear-coat. Here is another pic--with some side pieces; trying to decide if they should be color or black with gold designs on them later. The people still need lots of detail...sorta fun!

Friday, March 30, 2012

Furniture Re-do.


I got these two crappy little furniture pieces down the block last night for $15.00 apiece.

The 'chest on legs' is real wood and it will become an oriental-inspired chest someday, but I must change those hideous legs.
The golden one is real wood, fake crapwood (What kind of tree produces that?!), slick formica on the top and plastic 'fancy' front legs-yikes. The seller actually said, "ya know, ya might sand off that paint and they could look like real ivory!"--NOT.
I might faux silver the legs and top, paint it antiqued cream and robin's egg w/crystal knobs...then again, I might get crazy and paint it like a Klimt!

Now I just have to get inspired....good thing I can 'pre-plan' through PhotoShop!